
GSMSS User Panel Guide: How Customers Order, Pay and Track
This guide covers the customer side of a GSMSS store: everything your customers see after they sign in, and how they order, pay, track results and get help. Store owners can read it to know their own store, or send the link straight to a customer who asks "how does this work?".
Every GSMSS store has the same panel, in the store's own name, logo and colours. The menu on the left is the same on every page; on a phone it opens from the ☰ button at the top.
Creating an account and signing in
- Register with your name, email and a password (some stores ask for a few extra details). You may be asked to confirm your email.
- Sign in with your email or username and password. Many stores also offer Sign in with Google and Sign in with a passkey.
- Forgot your password? Use Forgot your password? on the login page and follow the link in the email.
- The small security check on the login page (type the characters you see) keeps robots out.
The dashboard
Your home screen after you sign in. The card at the top of the menu shows your Wallet Balance and your User ID (copy it with one click when support asks for it). The dashboard itself shows your order counts, quick buttons for IMEI and Server services, a Quick Order Lookup box, your last five orders and the store's announcements.
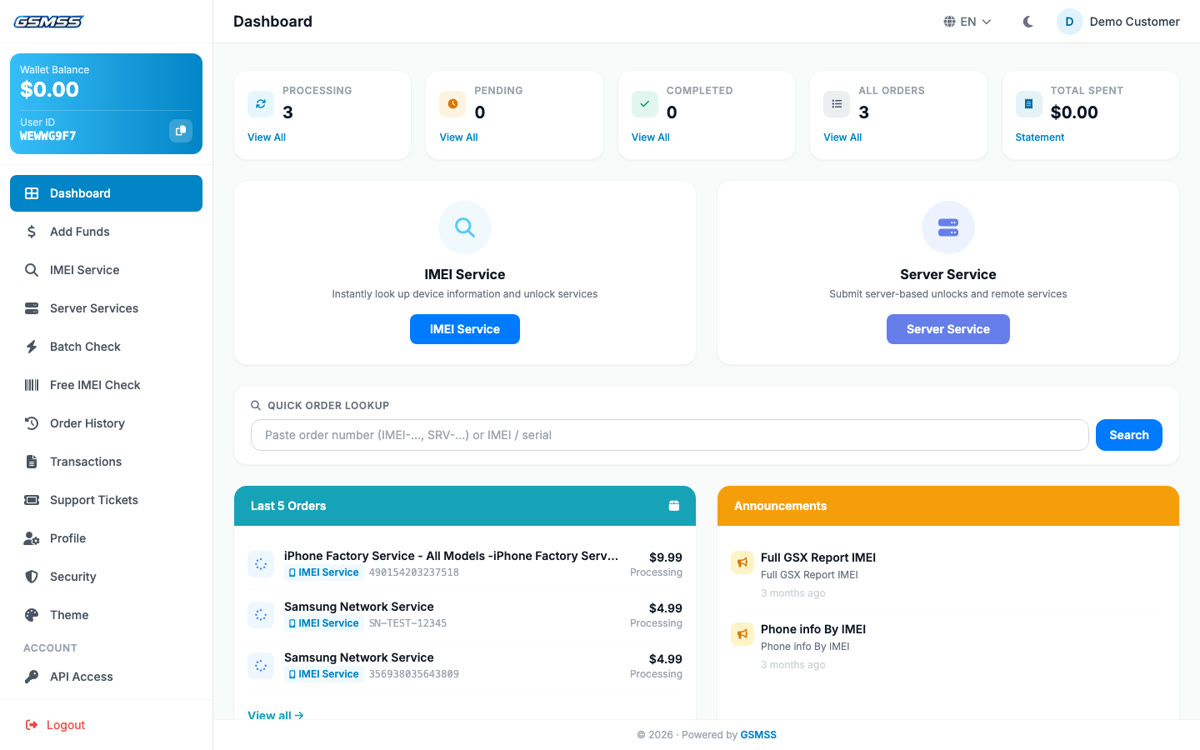
Some stores use the Service Catalog dashboard instead, which lists every service group on the dashboard itself. Everything else works the same.
Adding funds to your wallet
Orders are paid from your wallet, so you top it up first.
- Open Add Funds.
- Type an amount or tap a quick amount ($5, $10, $25…). The minimum is shown under the box.
- Choose a payment method. The store decides which ones are offered — for example PayPal, card, USDT, Revolut, PIX or bank transfer.
- Check the Order Summary on the right (amount, method, your balance after) and press Proceed to Payment.
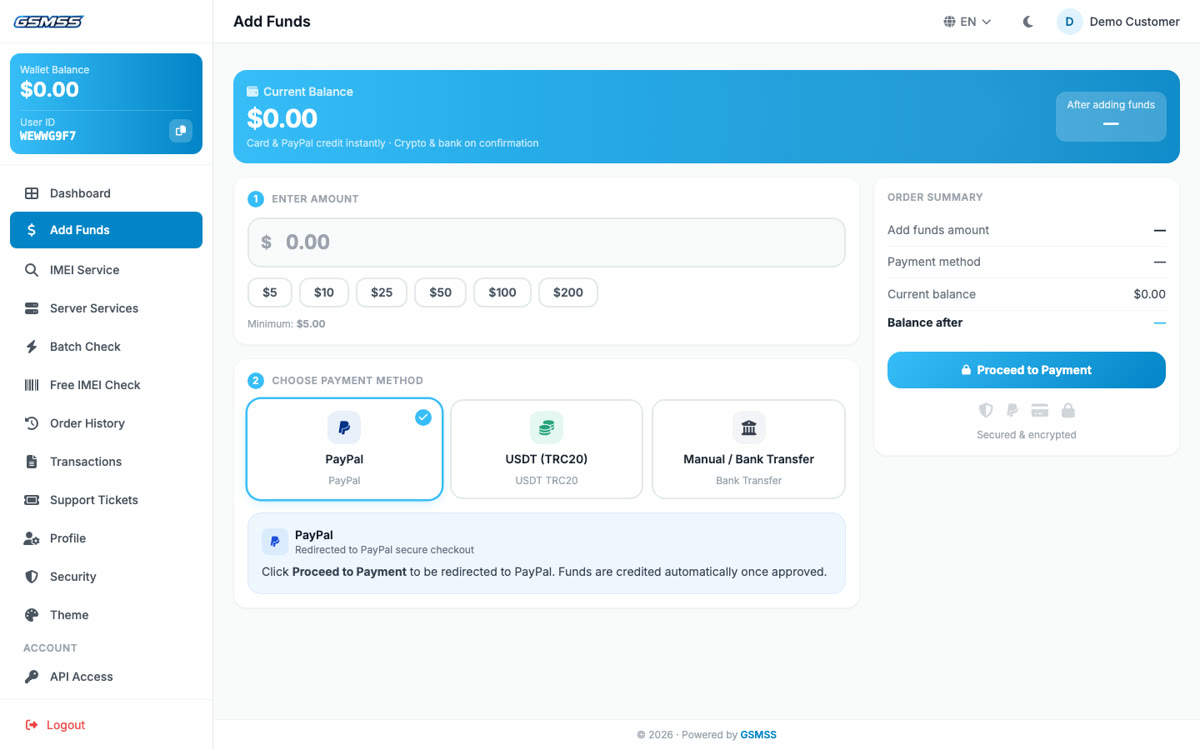
How fast the money arrives depends on the method: card and PayPal are credited automatically as soon as the payment is approved; crypto is credited once the transfer is confirmed on the network; bank or manual transfer is credited when the store confirms it has received the payment. Every top-up gets an invoice.
Placing an IMEI order
- Open IMEI Service. Services are listed by group, each with its delivery time and your price. Use the Group menu or the search box to find one, and tap the ☆ to keep favourites at the top.
- Click a service. It appears on the right under Selected Service, with its full description in the Service Info box — read it before ordering; it often says which models or conditions are supported.
- Enter the IMEI (dial
*#06#on the phone to see it) or serial number. If the service allows bulk ordering, paste several, one per line. - Add a note if you want, then press Place Order. The price is taken from your wallet.
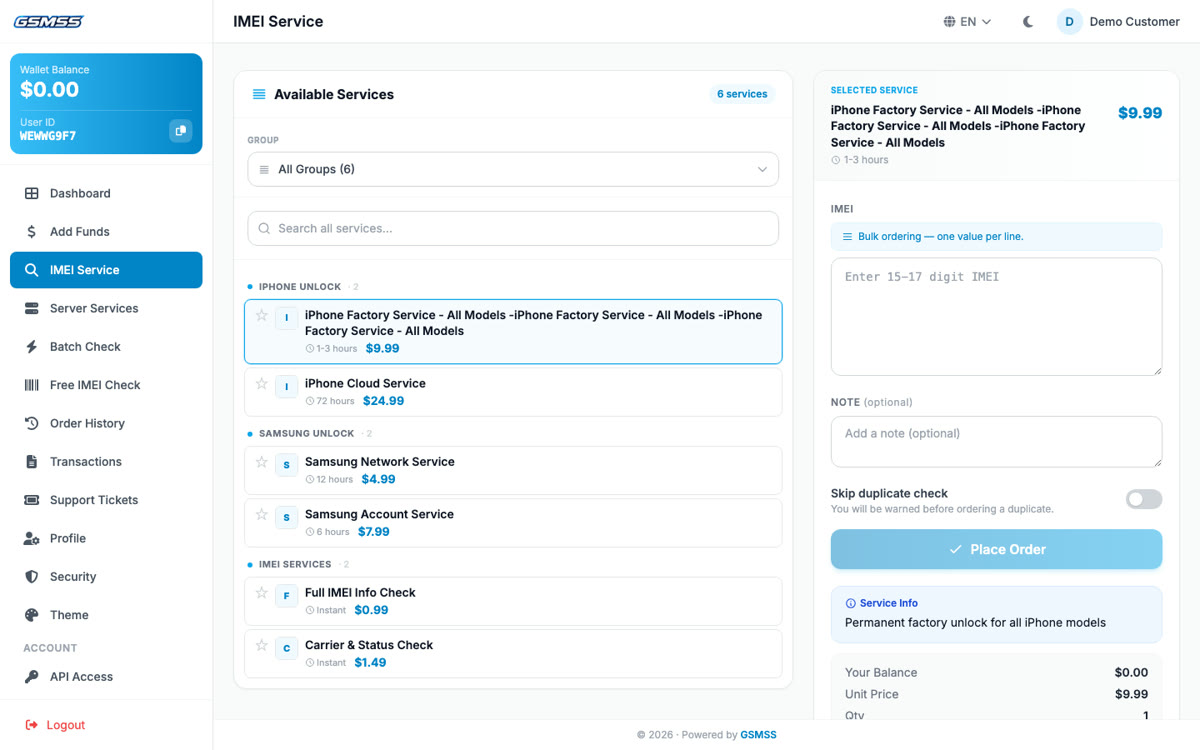
If you already ordered the same service for the same IMEI, you get a Duplicate order warning first, so you do not pay twice by mistake. Choose Yes, send again only if you really want a second order. The Skip duplicate check switch turns the warning off for that order.
If your balance is too low, the button changes to Insufficient balance — Add Funds and takes you to the top-up page.
Server services
Server Services work the same way, but instead of an IMEI you fill in whatever the service asks for — a username, a serial number, an email and so on. The fields are listed under Order Details once you pick a service.
Batch Check
For checking a list of IMEIs quickly (where the store offers it): open Batch Check, pick a service, paste the IMEIs or serials and press Start Batch Check. Each line shows its status and result live as it finishes, and you can press Stop at any time. When it is done, Download CSV saves every result in a spreadsheet.
Free IMEI Check
Free IMEI Check runs a basic lookup on an IMEI at no cost. Stores usually limit how many free checks you can run per day.
Order History: tracking your orders
Order History lists every order with its IMEI or serial, service, status, result code, price and date. Switch between All Orders, IMEI Orders and Server Orders, filter by status, or search by IMEI or serial. Tap the IMEI or code to copy it; View opens the full order.
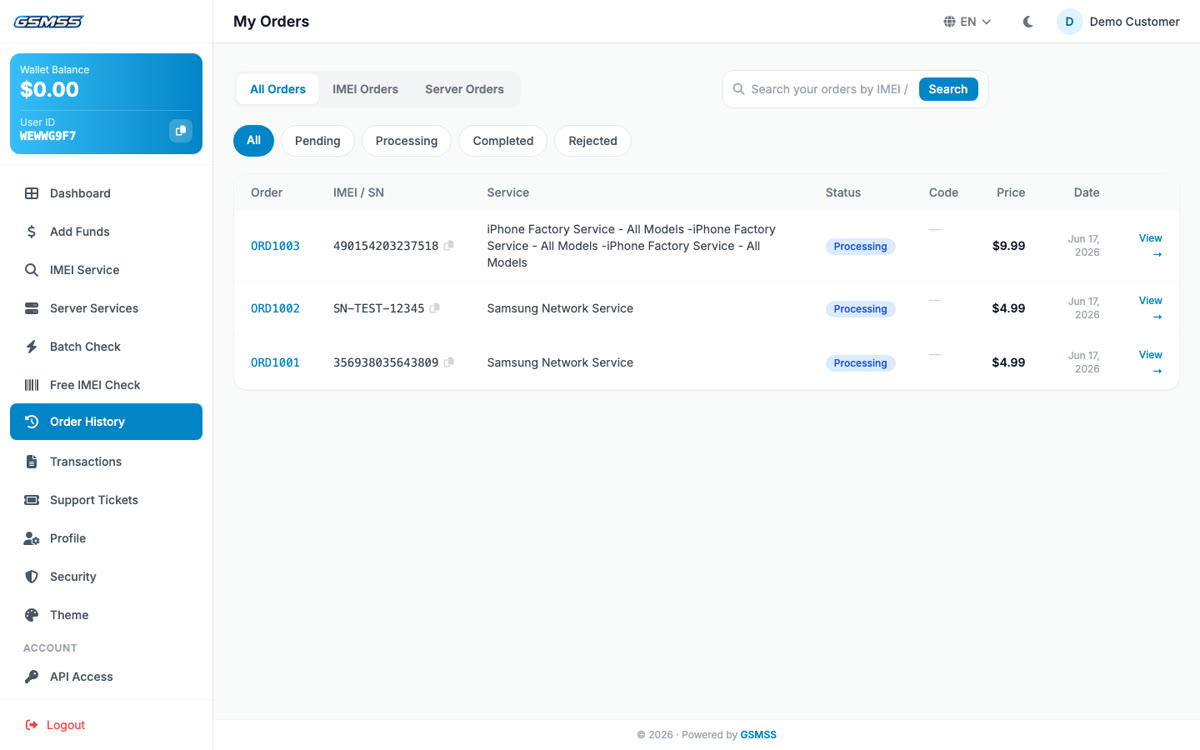
- Pending — received, about to be processed.
- Processing — being worked on. Results come in automatically, usually within the delivery time shown on the service.
- Completed — the result or code is on the order. Open it to read or copy it.
- Rejected — it could not be done; the price goes back to your wallet automatically.
Want to be told when an order finishes? Under Profile → Notifications, switch on Email me when my order status changes, or add your Telegram Chat ID for a Telegram message instead.
Transactions
Transactions shows every movement in your wallet — top-ups, order charges, refunds, bonuses and adjustments — with the balance after each one. Use the search box to find a particular payment or order.
Support tickets
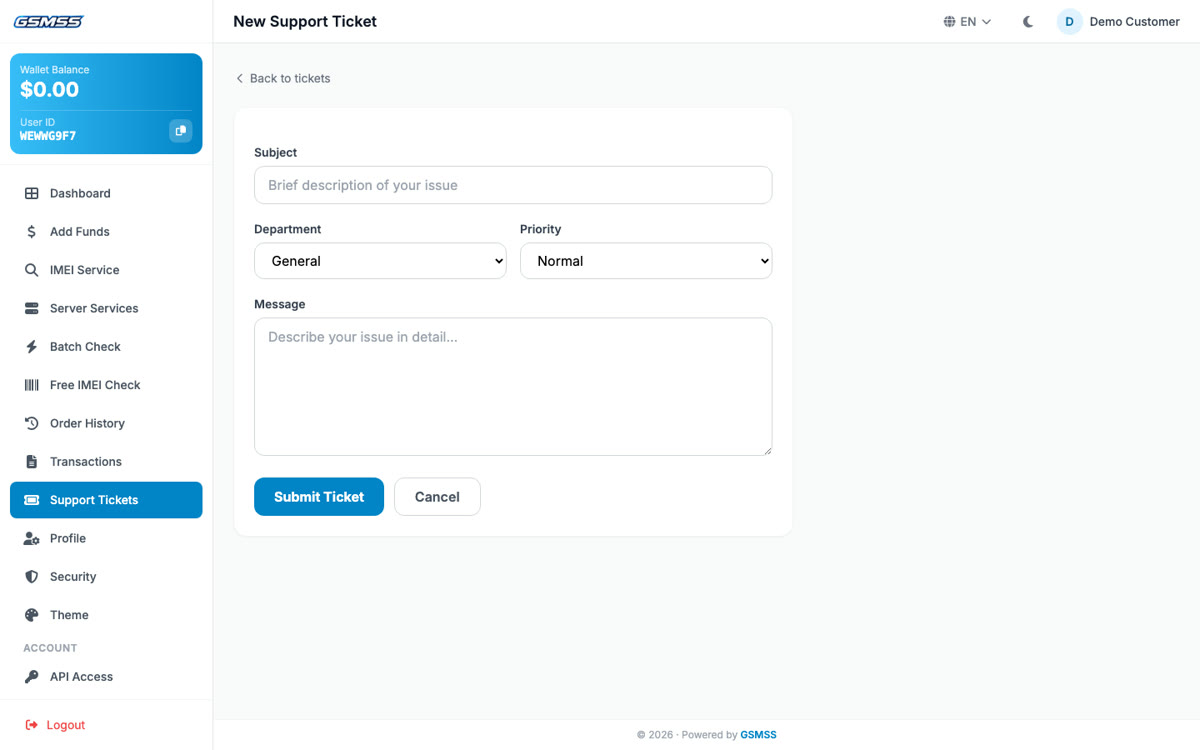
Need help with an order or a payment? Open Support Tickets → New Ticket, write a short subject, pick a department and priority, describe the problem (include the order number) and press Submit Ticket. Replies appear on the ticket and by email.
Profile and security
- Profile — your name, company, phone, WhatsApp, address and country, your notification choices, and Change Password. Your email is locked; ask support to change it.
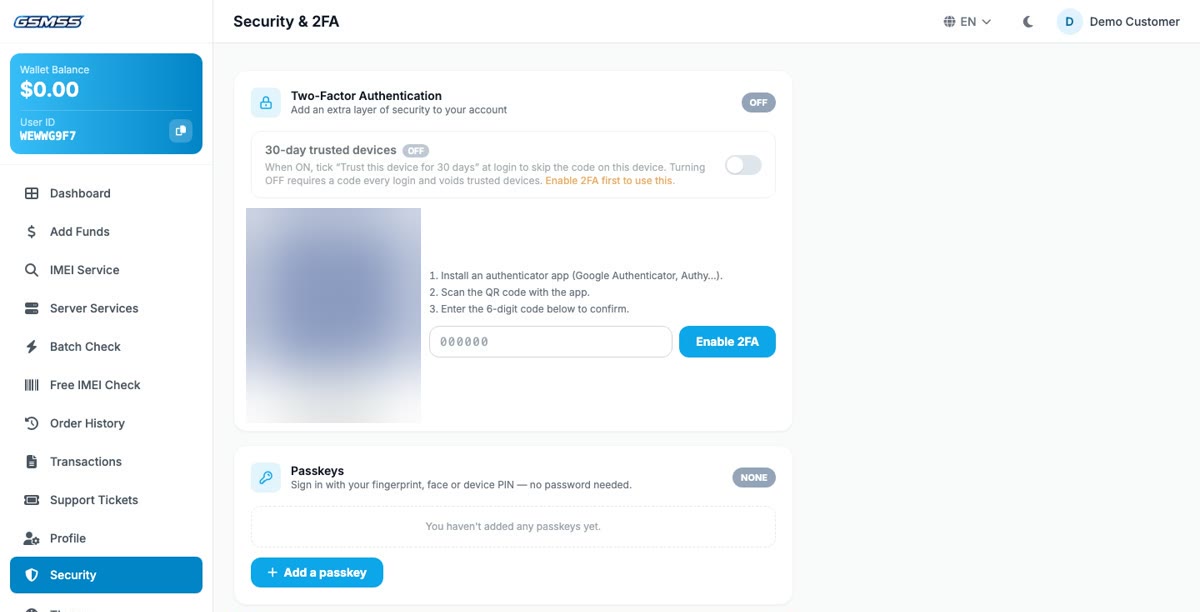
- Security — turn on two-factor authentication: install an authenticator app (Google Authenticator, Authy…), scan the QR code and enter the 6-digit code. You can trust a device for 30 days so you are not asked every time.
- Passkeys — sign in with your fingerprint, face or device PIN, with no password at all. Press Add a passkey on the device you use.
- Login History — your last ten sign-ins with IP address, country and browser. If you see one that was not you, change your password and turn on two-factor.
Theme, language and dark mode
Theme lets you change the colours of your own panel. Your choice is saved on the device you are using and nobody else sees it. The globe button at the top switches the language, and the moon button switches between light and dark mode.
API Access (for resellers)
If you run your own shop or software, API Access shows your personal API key. With it you can place and check orders automatically, using the same DHRU Fusion-style API most tools already speak, or a REST API. The store's API docs page explains every call. Keep the key private; Regenerate (with your password) replaces it instantly if it ever leaks.
Common questions
My order has been Processing for a long time.
Check the delivery time on the service first — some take hours or days. If it is well past that, open a support ticket with the order number.
I paid but my balance did not go up.
Card and PayPal payments usually show within a minute. Crypto waits for network confirmation, and bank transfers wait for the store to confirm. If it is still missing, open a ticket with the payment reference.
An order was rejected. Do I get my money back?
Yes — a rejected order is refunded to your wallet automatically. You can see the refund under Transactions.
Can I use the store on my phone?
Yes. The whole panel works on phones and tablets; the menu opens from the ☰ button.
Store owners: for the admin side, see the GSMSS admin panel guide and how to change your theme and colours.
Ready to launch your own GSM store?
Get the complete GSMSS platform — order management, dashboards, wallet, API integrations and more.